I had seen the hack Pete Will did on his doorbell and I knew I wanted to do that with my own doorbell. But it was a project I postponed until I had some more time. At least that was my thought, but things don't always go as planned. The doorbell that was installed when I bought the house, recently decided to go to retirement.
I could have gone to home depot, but I did what a maker does. I created my own MySensors powered doorbell. Before I show the final result, I'll describe the decisions I made for this project. The first major requirement was that it had to be as cheap as possible. If it wasn't going to be cheaper than one I could buy, my better half wouldn't approve on me designing and building our own doorbell chime.
Okay, that put an end to all crazy ideas I immediately had. This meaning no MP3 or other soundboard, because they cost money and change is that I needed an extra amplifier. Now my dad recently retired and closed has old electronics shop. I was able to save some old electronics circuits magazines he was planning to throw away. If you're about my age, you might remember them from the 80's and 90's. Magazines full with cool circuits - including print lay-outs - you could build yourself. But only if you had money, which I mostly didn't have during my teenage years - because back then electronic components were expensive.
So much for that memory lane, let me continue - you probably have more things to do than reading about my memories. In one of those magazines, I found a circuit describing a melody playing door chime. Which inspired me for my own design. I did some research on the internet and found that a lot of those melody IC's just aren't available anymore. I was lucky to come across the HK292 doorbell chime IC. Which is a cheap 4 pin IC completely designed as a doorbell chime.
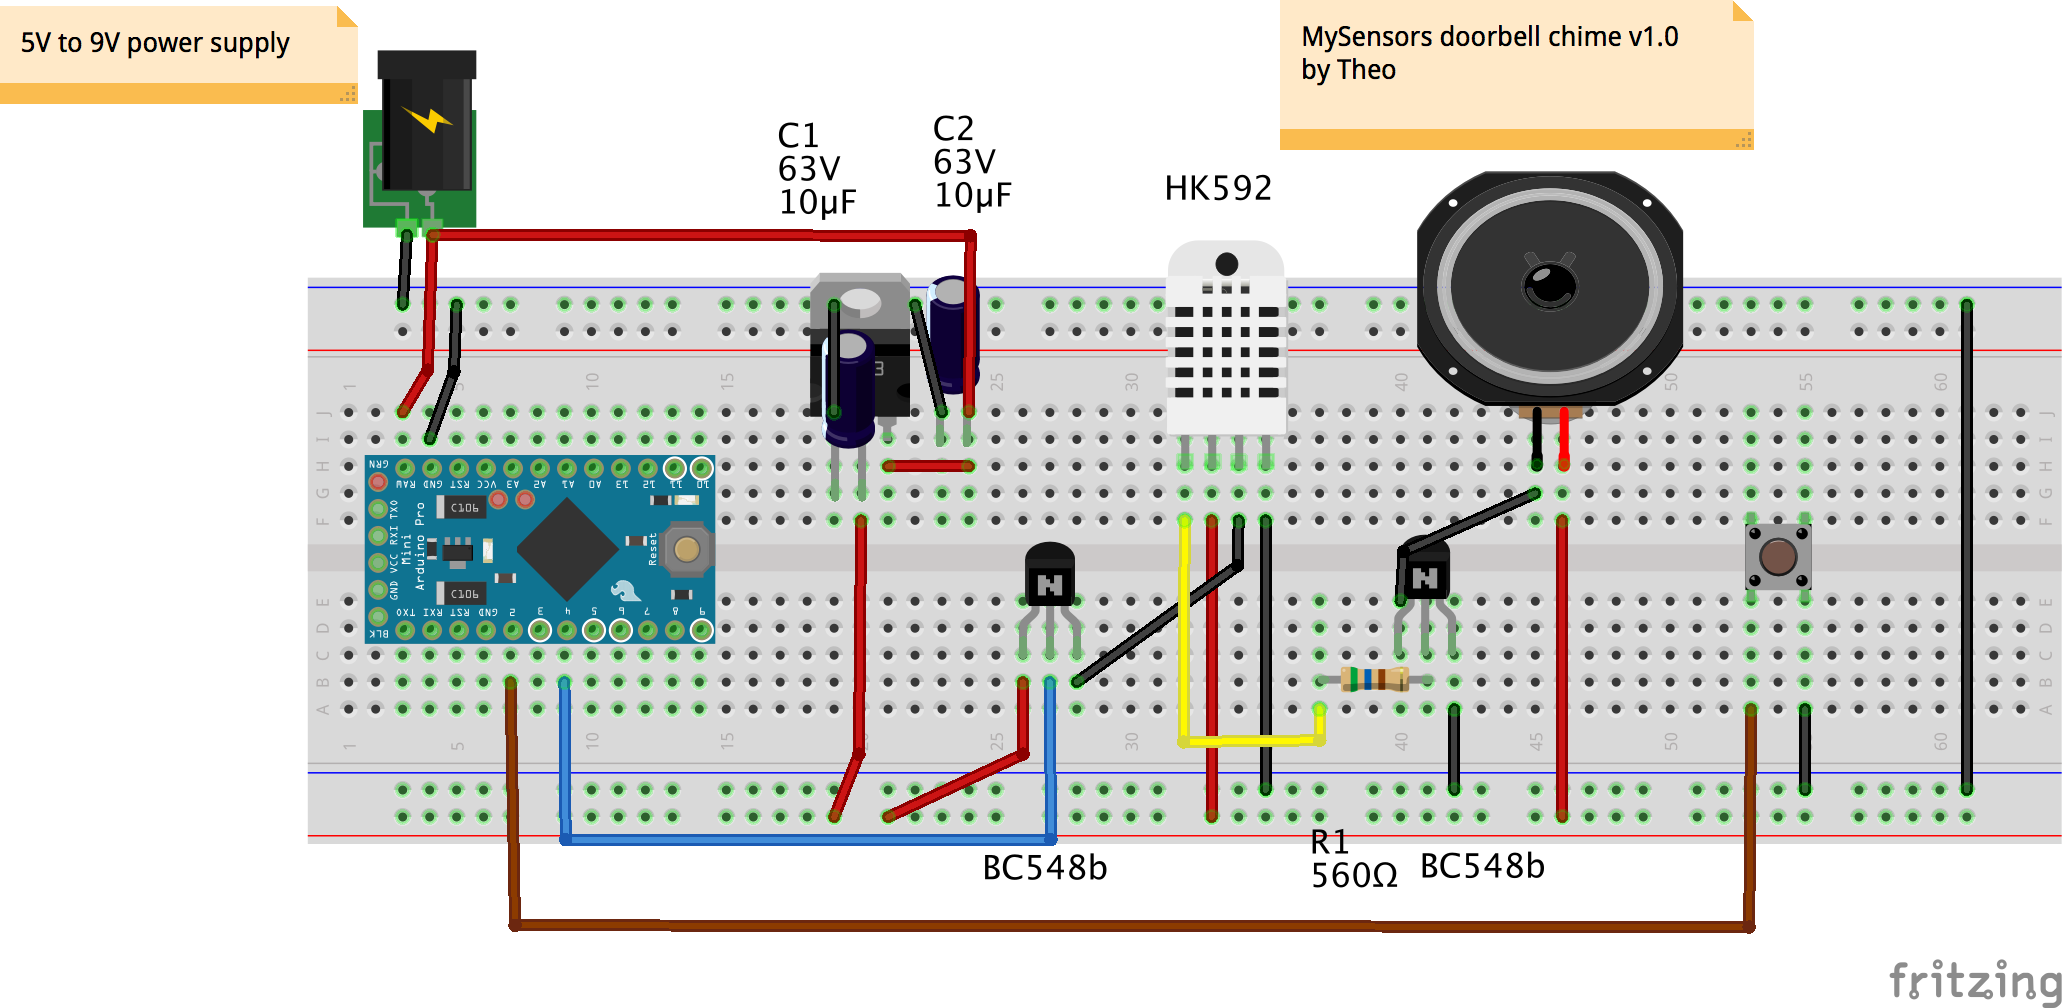
It's a cheap IC - just under 2 euro's and you'll only need a cheap speaker, a switch and some really cheap BC548 transistors. Because I already had some parts I think it costed me about 4 euro's. I hooked up the IC according to a schematic I found and tested it. It worked like a charm. Than came the real challenge, hooking it up to an Arduino. I needed all my electronics knowledge but managed to do so. Here's the Fritzing of the HK592 connected to a ProMini 3V. Be aware that these chips can only be fed with 3V, you'll fry them up if you provide more. I left out the NRF20L01+ on purpose in this Fritzing, it would be too many wires.

p.s. Sketch will follow after this weekend.
After you've hooked up everything to the Arduino and have uploaded the sketch, you should see two different sensors/actuators popup in your HA system. One is the mute switch (you can mute the doorbell chime) and the other one is the actual doorbell. So that way you can send notifications if someone presses the doorbell to you mobile phone or whatever it is, that you want to send a notification to. I'll add an volume level sensor after I receive the digital potentionometer I ordered on aliexpress.
I really enjoyed this project. The mixing of the old electronics components was really fun. I'd never thought about this before, but using the hk592 IC saved me a lot of time. Time I'd otherwise needed to turn of the doorbell chime after a couple of seconds. The HK529 only needs a 3V trigger and it'll do the rest.
I'll experiment some more. Maybe a simple resistor between the Arduino and the HK502 trigger pin will be enough (it's still connected to an Arduino Uno during development). But I was just too exited about this project and couldn't wait to show it to you.
Update 1.
- Changed the LD33CV to a LE33CZ-TR. The LD supplies up to 1 A which is way too much. The LE33-CZ-TR can supply up to 100 mA which is plenty enough.
- Added sketch. The sketch supports a HC-SR505 Mini pir. This motion sensor is less sensitive than it's bigger brother HC-SR501. But it can be fet with 5V and has a 3.3V output. Which is perfect for me, because I use a ProMini 3.3V. The motion sensor is optional. You can comment the first #define if you don't want it.
A note on the component.
- The HK592 is not widely available. You could use a UM348x IC. But I think they'll keep playing until the melody is completed. But it's worth to try.
- Honsitak Taiwan - the manufacturer - used to made a lot of different melody IC's which are a lot of fun to play with. Maybe you can use one of them as a replacement. There's an IC with different christmas songs, one with a crying baby and so on. I just don't know if I'd want them as doorbell chime. The HK592 only plays a double ding-dong.
| Name | Size | # Downloads |
|---|---|---|
| doorbell.ino | 7.82 kB | 667 |