Ever had complaints from your other half about those ugly things you're trying to put everywhere in the house ? Yes, we all do :D But that's not a fatality, you can build one you'll be proud to show for less than 12$ in AliExpress parts !
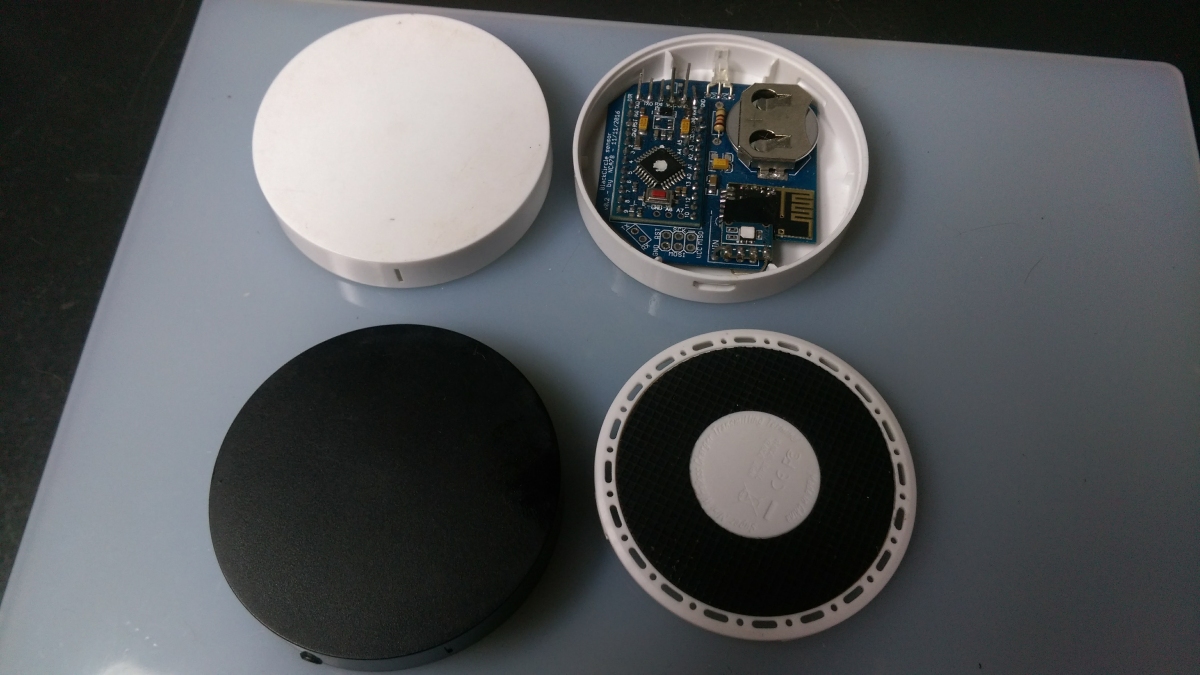
After a long quest, countless orders of objects I hoped to recycle into good looking sensors I finally found one that fits the bill: good looking, reasonably priced and big enough to contain an easy to solder MySensors node. It's a wireless charger, it seems a copy of a LG model that has a puck shape and 2 great features: a front led and vents at the bottom to ensure good airflow on a temperature/humidity sensor.
I tried to make this board as simple to solder as possible. Due to limited height I couldn't include a normal sized NRF24 module and had to use the SMD version, but it's not that hard to solder with its castellated pins :)
NO MORE WARNING: PCB tested, runs perfectly :)
You can find information about ordering the wireless chargers in this forum thread: https://forum.mysensors.org/topic/5033/clean-looking-sensor-node/

Preparing the ProMini
What you need for this step
- Arduino Pro Mini Board, it MUST be a 3.3V/8MHz version.
- headers for the Pro Mini: side headers, 2 pins for A4/A5 and straight pins (not angled) for programming headers. You do not need headers for A6/A7 and other pins on the small side opposite the programming headers.
- small screwdriver
- soldering iron
- small breadboard to help soldering the headers
Removing leds and regulator
We need to remove leds and voltage regulator to save as much power as possible. I made a video that is low quality but shows how easy it is to unsolder led and voltage regulator on a pro mini, all you need is a tip that is not too big, clean (not like mine :)), and with a good amount of solder on it. Of course, it is smarted to first unsolder the voltage regulator, then the power led as without the regulator you will have more space for your soldering iron. Instead of removing the power led, you can remove the resistor that is next to it, with "102" marking (it will produce the same effect and it's a bit easier to unsolder)
- removing the power led is absolutely mandatory
- led on pin 13 can stay in place but it's on the side and very easy to remove, so why keep it and let it draw unnecessary current ?
- regulator has reverse leaking voltage, it's not stated on the datasheet of the regulator on my pro mini boards so I expect it to be not so good (several µA) and I prefer to remove it. If you're not feeling confident, you can keep it but you could have significantly lower battery life with the button cell powering this sensor.
Soldering headers
solder side and A4/A5 headers on the ProMini board
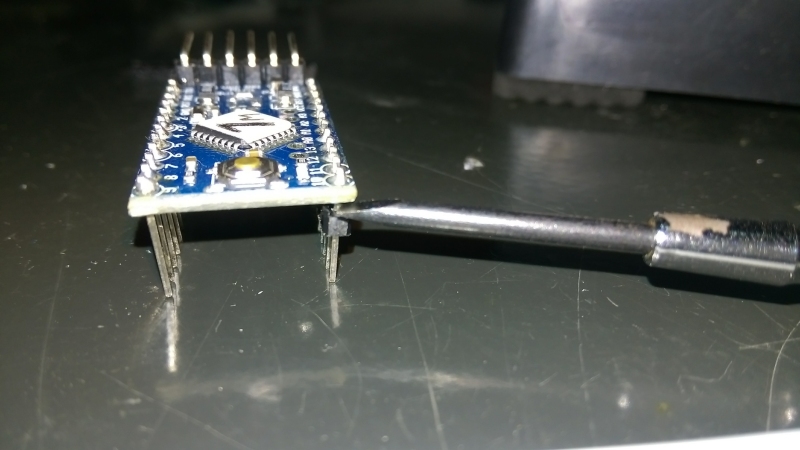
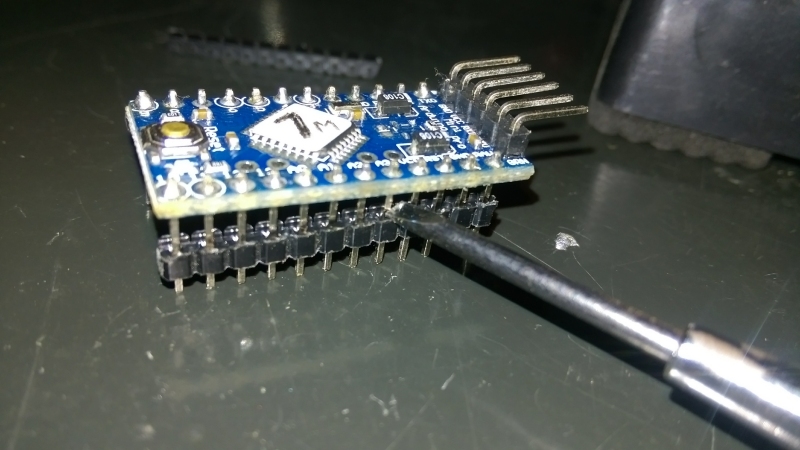
remove plastic separators of the headers. This is an easy step if you are patient and careful. There is a slot at the ends of the plastic separator where you can insert the screw driver without damaging the board. Push the 2 ends of the header a little bit down, just enough to insert the screw driver between plastic separator and the board on the side.

On the side, insert the screwdriver and push a little bit down, move progressively toward the center until plastic separator is moved down on all its length. Repeat until separator reaches the bottom of the pins and remove it carefuly. Remember, always do it millimeter by millimeter so you will not exert too much force on the header and not bend them. Put the bottom of the pins on a hard surface when you push down, this will also limit the mechanical force on the pins

- solder straight headers in the programming headers. Be careful, you have to solder them reversed = solder on the bottom and long part+plastic separator on top (do not do like on the pictures just above, this ProMini was prepared for another project)
- remove plastic separator from the programming header
Updating bootloader and BOD
From my experience with battery powered sensors using NRF24, you will get a better battery life if your arduino runs at 1MHz. It allows to run at much lower voltage (down to 2V) so you can get all the energy from CR2032 cell. But for that, you need to remove BOD or set it lower at 1.8V, as by default the BOD (Brown Out Detection) will reset your arduino at 2.7V. There are already some tutorials to explain how to write bootloader on the MySensors forum. Don't bother using a programmer, just use an arduino nano or uno with the ArduinoISP sketch (from the examples in Arduino software) and flash a 1MHz bootloader with 1.8V BOD (or no BOD).
After you have updated bootloader and BOD, connect a led and resistor on pin 13 and test with the blink sketch. Check that the interval between blinks is correct. If not you have probably a problem with the frequency of the board selected in Arduino.
Assembly
Use the assembly order suggested below, I think it's the more convenient.

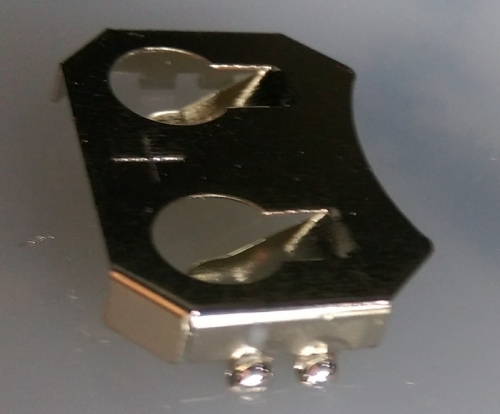
CR2032 battery holder
You should first solder the battery holder, it's a bit difficult because the holder is a big piece of metal and will absorb heat from your soldering iron. So I suggest the following process :
- increase temperature of your soldering iron
- put a blob of solder on the "legs" of the holder, as the holder is alone and not on the board you don't need to be afraid of excessive heat

- put back your soldering iron to normal temperature
- put solder on ONE pad of the board, be generous
- move holder in place with plyers, at the same time melt the solder on the pad with your soldering iron so the holder legs are tight on the PCB pad and not floating in the solder. When holder is in place remove soldering iron to let solder solidify while keeping holder in place with your plyers
- on the other side you will just need to put solder on the pad and melt it, while pressing on the holder with your plyers so that it's legs stay firmly on the pad. Keep pressing after removing the soldering iron until solder solidifies.
Radio module
(Clear blue color) Don't be afraid of soldering the SMD radio module, it's simple :
- use a fine and clean tip
- put the PCB on a flat surface it will adhere too. I use a small silicon mat from AliExpress (visible on the pictures), it's great
- put solder on the first pad of the connector (and only the first one), on the NModule PCB
- keep your soldering iron in one hand, and with the other align the radio module with it's footprint, just next to the soldering tabs. Melt the solder of the first tab and slide module in place, press a bit to keep it flat on the PCB. Then remove your soldering iron. Your module should be "tacked" on the PCB and not move anymore and of course well aligned. If it's not aligned and/or not perfectly flat on the PCB (you should have no space between radio module and PCB), repeat this step.
- Now is the good moment to put some flux, then solder the other tabs one by one. Don't put too much solder, just enough to have a good joint between the PCB and the castellated pin of the radio module. If you put too much solder you take the risk of creating a short.
- usually I test the resistance between adjacent pins of the radio module, it should be several MOhms. If you have a low resistance, put some flux, clean your soldering tip of any solder and put it on the joints, moving from module to the connection tab to remove excess solder from between the castellated pins
ATSHA chip and pullup resistor
(Yellow color) If you want to sign your messages, it's time to solder ATSHA chip and it's pullup resistor while you still have some space.
ProMini board
Solder the ProMini board, side headers and A4/A5 pins. Put it as close as possible to the PCB, you might have problem because of the soldering points of the programming headers. In this case melt the solder on them to be able to push down and remove any space between ProMini and PCB. After ProMini is soldered, cut the headers as close as possible to the PCB. It is important as the height available in the enclosure is limited.
LED and resistor
(Pink color)
- Solder the LED with green pin on the left (easy to recognize, it's the shortest) and red pin on the right (middle sized pin).
- Solder resistor on the left (with "220-330" marking). I use 220 Ohms resistor to have a bright flashing of the LED but you can use an higher value like 330 Ohms if you find it annoying at night :)
Radio capacitor
(Dark blue color) It should be at least 4.7µF but I suggest to use 10µF. Buy a 10V rated version to lower the size as much as possible. It cannot stay straight on the board so you will have to bend the pin and put it over the radio. Meaning you first need to put a bit of electric tape on the radio module to avoid any short circuit. Be careful at the polarity, GND is marked "-" on the board, it's the round hole while Vcc is the hole with the square pad.
Reserve capacitors
(Black color) To help the battery during high load (radio TX/RX) we need to use reserve capacitors. It must be at least 100µF but you can put 2 capacitors so 2100uF. Here again buy some that are 10V rated to save volume, and use 2100 instead of 1*220 as 220µF might not fit in the enclosure. Like for the radio capacitor, there's not enough depth in the enclosure to put the capacitors straight so you need to bend their pins to put them along the PCB, as drawn. I suggest you put a CR2032 cells (I use a dead one for that) in the battery holder to make sure you will have enough space for the button cell to slide in after you solder the reserve capacitors. Be careful at the polarity, GND is marked "-" on the board, it's the round hole while Vcc is the hole with the square pad.
SHT21/SI7021
(Purple color) You have to use the "SMD" version of this board, it's more compact and doesn't have a regulator which is much better for battery life. We solder it using the pins but do not use the through-hole version of the SHT21/SI7021 breakout board: the pinout is not the same ! Also, remember to never remove the white protective film on top of the sensor. If you remove it your measurements (especially humidity) will go wrong very quickly as the inside of the sensor will get dirty.
Script
The included script will send temperature, humidity and battery level at regular intervals (default is 1 minute).
- at startup after MySensoors is initialized it will briefly flash red and green
- when running, it will flash green at each data send
- if battery level is low (by default 30%) it will flash in red color instead
Sending frequency, low battery level, led flash duration and other settings are (I think) clearly explained at the beginning of the script. I've set some short values for initial connection and reconnection settings, that is made to save the battery in case the connection to gateway is lost.
Wrapping up
Opening the wireless charger
This is not easy, you have to put a small screwdriver in one of the vents and pull. If it's too hard try the next vent until you have better luck :) I had success using a "DIP chip extractor" that is very bad at extracting DIP chips, but happens to have legs exactly of the same width than the vents, so if you have one laying around use it instead of the screwdriver.
Put the PCB inside.
PCB will fit in the enclosure with a little bit of force. You can use some double sided tape if you want but I didn't find it necessary. The "bottom" side of the PCB will be at the top side of the enclosure, so that the sensor is at the bottom near the vents of the enclosure (see picture). BUT when trying to fit the PCB in you will notice that you have a problem to fit the programming headers. That's why you needed to select straight headers: you can bend them as you wish, as close as possible to the PCB of the Pro Mini. Then, some of them will be too long to fit in the enclosure so you will have to shorten them until the PCB fits in.
| Part | Value | Device | Package | Description | AliExpress link |
|---|---|---|---|---|---|
| CNRF | 10uF - 10V | CAP_POLPTH2 | CPOL-RADIAL-10UF-25V | Radio capacitor | |
| CR2032 | 20mm coincell | BATTERY20MM_4LEGS | BATTCON_20MM_4LEGS | CR2032 battery holder | https://www.aliexpress.com/item/50pcs-SMD-Tab-20mm-CR2032-2032-Battery-Button-Cell-Holder-Coin-Cell-Retainer-Battery-Holder-surface/32732961416.html |
| CRES | 100uF - 10V | CAP_POLPTH2 | CPOL-RADIAL-10UF-25V | Reserve capacitor | |
| CRES1 | 100uF - 10V | CAP_POLPTH2 | CPOL-RADIAL-10UF-25V | Reserve capacitor | |
| M1 | WIRELESS-NRF24L01SMD | WIRELESS-NRF24L01SMD | WIRELESS-NRF24L01-SMD | 2.4 GHz Wireless Module based on NRF24L01 chip | https://www.aliexpress.com/item/10pcs-Free-Shipping-NRF24l01-2-4GHz-Wireless-Module-Mini-Version/32430639804.html |
| PROMINI | 3.3V / 8MHz | ARD_PRO_MINI_CLONE1 | PRO_MINI_CLONE1 | Pro-Mini Arduino Clone | |
| RATSHA | R_0805 | R_0805 | Pullup resistor for ATSHA | ||
| R_LEDS | 220-330 | RESISTORPTH-1/4W | AXIAL-0.4 | Current limiting resistor for LED | |
| SHT21 | BME280_SHT21SMD_SI7021_DIP | BME280_SHT21SMD_SI7021_DIP | I2C_BREAKOUT_SHT21_SMDDIP | I2C SMD breakout board for SHT21/SI7021 | https://www.aliexpress.com/item/Industrial-High-Precision-Si7021-Humidity-Sensor-with-I2C-Interface-for-Arduino/32524005324.html |
| U$2 | LED-DUALCOLOR3MM-THROUGH-HOLE | LED-DUALCOLOR3MM-THROUGH-HOLE | LED-DUALCOLOR-3MM | 3mm Red + Green common cathode LED | https://www.aliexpress.com/item/X153-10pcs-LED-3mm-Round-Diffused-Red-Green-two-Color-Common-cathode-LED-Diode-Light-Emitting/32659046735.html |
| U2 | ATSHA | IC_ATSHA204A_CRYPT | SOT23-3 | ATSHA 204A | https://www.aliexpress.com/item/Free-Shipping-10-pcs-lot-ATSHA204A-STUCZ-T-ATSHA204A-STUCZ-ATSHA204A-SOT23-new-original-electronics/32541710425.html |
| Name | Size | # Downloads |
|---|---|---|
| BlackCircle.GBL | 87.8 kB | 641 |
| BlackCircle.GBO | 17.86 kB | 660 |
| BlackCircle.GBP | 482 B | 610 |
| BlackCircle.GBS | 1.9 kB | 644 |
| BlackCircle.GML | 482 B | 602 |
| BlackCircle.GTL | 81.79 kB | 722 |
| BlackCircle.GTO | 51.32 kB | 658 |
| BlackCircle.GTP | 4.23 kB | 654 |
| BlackCircle.GTS | 2.46 kB | 606 |
| BlackCircle.TXT | 1.04 kB | 519 |
| BlackCircle.brd | 68.12 kB | 791 |
| BlackCircle.sch | 177.63 kB | 796 |
| COPYRIGHT.txt | 428 B | 494 |
| PRODUCT.txt | 110 B | 492 |
| LICENSE.pdf | 95.73 kB | 290 |
| License_howto.pdf | 55.06 kB | 346 |
| Name | Size | # Downloads |
|---|---|---|
| BlackCircleSensor.ino | 10.8 kB | 704 |
| Revision | Created | Layers | Dimensions |
|---|---|---|---|
| rev1 | 9 years ago | 2 | 46 × 49 |
